Ultimate Guide to Green Screen Setups: Tips & Tricks for Seamless Chroma Keying
.jpg)
A green screen setup is a technique used in video production and photography where a green screen backdrop is used to create visual effects by replacing the green background with various digital or real-life backgrounds during post-production. This setup opens up a world of creative possibilities and provides several benefits for content creators and filmmakers. A reputable video production company, TechSmith, highlights the advantages of using a green screen setup, which include flexibility in background selection, creative possibilities, and cost-effectiveness.
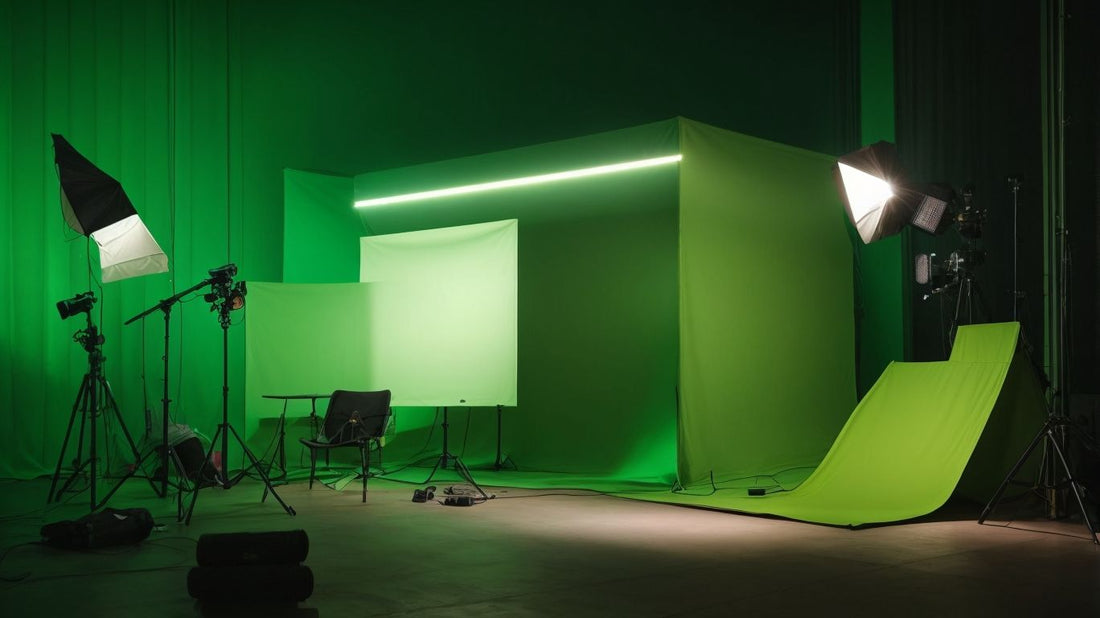
To create a successful green screen setup, several essential equipment pieces are required. These include a green screen backdrop, lighting equipment to ensure even lighting on the subject and the screen, a camera with a tripod for stable shooting, and editing software for post-production work.
Setting up a green screen requires attention to detail. Tips for a successful setup include selecting the right green screen material, implementing proper lighting techniques, avoiding shadows and spill, and optimizing camera settings for the best results.
Avoiding common mistakes is crucial in achieving a professional green screen setup. Inconsistent lighting, an uneven green screen surface, poorly placed subjects, and inadequate post-production editing are common pitfalls to avoid.
Professional applications of green screen setups are vast and diverse. They are widely used in video and film production to create captivating visual effects, in live streaming and virtual events to provide immersive experiences, and in educational videos and tutorials to engage learners with dynamic and interactive backgrounds.
By understanding the concept, benefits, equipment requirements, setup tips, and professional applications of a green screen setup, content creators can enhance their creativity and produce visually stunning and engaging content.
What is a Green Screen Setup?
Have you ever wondered how those amazing visual effects are created in movies and videos? Well, it all starts with a green screen setup. In this section, we'll dive into the world of green screen technology and chroma keying, uncovering the magic behind the scenes. We'll also explore the fascinating history of the substitution process in filmmaking, revealing the evolution of this ingenious technique. Get ready to unlock the secrets of creating jaw-dropping visuals through the power of green screen setups.Understanding Green Screen Technology and Chroma Keying
Understanding Green Screen Technology and Chroma Keying is essential for filmmakers looking to create visually stunning and immersive videos. Green screen technology, also known as chroma keying, is a technique used in filmmaking and video production. It allows filmmakers to replace the background with any desired image or footage by using a green screen backdrop. This separation of the subject from the background opens up limitless creative possibilities.
Achieving a successful green screen effect requires proper lighting. Even illumination is necessary to ensure seamless background replacement. In addition to lighting, editing software is also crucial in refining the final result.
An iconic example of the use of green screen technology is seen in the 1999 film "The Matrix." In a scene known as "bullet time," this technique was used to create the breathtaking visual effect of Neo dodging bullets in slow motion. By using green screen technology, the filmmakers were able to seamlessly merge live-action footage with computer-generated environments, immersing audiences in the world of The Matrix. This innovative use of green screen technology revolutionized the way action sequences were filmed and showcased the immense potential of chroma keying in the film industry.
The Substitution Process and its History in Filmmaking
The history of the substitution process, also known as chroma keying, in filmmaking is extensive. From its early days in the 1930s to the present, this technique has evolved with advancements in technology. The substitution process, or chroma keying, is the method of replacing the green screen background with a different image or video during the post-production stage. It has been utilized for decades to produce visually stunning effects and aid in storytelling. Thanks to this innovative process, movies and TV shows are now able to transport audiences to incredible locations and create lifelike scenes that would have been impossible otherwise.
Benefits of Using a Green Screen Setup
Looking to up your visual content game? Let's dive into the fascinating world of green screen setups and explore the benefits they offer. From the flexibility in background selection to unlocking creative possibilities for dynamic visuals, this section highlights why a green screen setup is a cost-effective solution for filmmakers on a tight budget. Get ready to discover how this ingenious technology has revolutionized the way we create captivating on-screen experiences.Flexibility in Background Selection
One of the key benefits of using a green screen setup in filmmaking and video production is the flexibility it offers in background selection. Filmmakers have the freedom to digitally substitute the green background and choose any background they desire. This flexibility brings several advantages:
- Enhanced storytelling: The green screen allows filmmakers to transport their characters to different locations, creating a more immersive and visually captivating narrative.
- Creative control: Filmmakers can experiment with various backgrounds, adding visual appeal and enhancing the overall aesthetic of the production.
- Cost-effective solution: Instead of physically traveling to different locations, a green screen setup enables filmmakers to create diverse settings within a controlled environment, saving time and money.
- Consistency in branding: Green screen setups provide the opportunity to maintain consistency in the visual style of a project, ensuring that the background aligns with the desired brand image.
Creative Possibilities for Dynamic Visual Content
A green screen setup offers endless creative possibilities for dynamic visual content:
- Background Selection: With a green screen, you can replace the background with anything you envision, from exotic locations to futuristic landscapes.
- Virtual Sets: Create virtual sets and environments that would be impractical or impossible to build physically, enhancing storytelling and immersion.
- Special Effects: Utilize green screen technology to incorporate awe-inspiring special effects, such as explosions, flying, or transforming characters.
- Multi-camera Shots: Achieve complex multi-camera shots seamlessly, switching between different angles and perspectives in one continuous scene.
- Product Demonstration: Showcasing products in action becomes easier with the ability to demonstrate features against any background or environment.
Cost-Effective Solution for Filmmakers on a Shoestring Budget
A green screen setup offers a cost-effective solution for filmmakers on a shoestring budget. Here are some benefits and tips for making the most of limited resources:
- Flexibility: With a green screen, filmmakers can create any background they desire, eliminating the need for expensive set construction.
- Creative possibilities: The use of a green screen allows for the creation of dynamic visual content, opening up endless possibilities for storytelling.
- Cost-effective: Investing in a green screen setup is a budget-friendly alternative to building elaborate sets or shooting on location.
To make the most of a limited budget:
- Choose affordable green screen materials, such as paper or cloth, instead of more expensive rigid options.
- Utilize natural lighting or affordable lighting equipment to ensure consistent illumination.
- Optimize camera settings and take care during post-production editing to enhance the chroma key effect without costly equipment.
With these tips, filmmakers can achieve professional-looking results without breaking the bank.
Essential Equipment for a Green Screen Setup
Looking to create your own green screen setup? Today, we'll dive into the must-have equipment that will bring your projects to life. From different backdrop options like cloth, rigid, or paper, to lighting equipment for that perfect even lighting, we'll cover it all. We'll also explore camera and tripod considerations for stable shots and recommend top editing software for seamless background replacement. Get ready to transform your videos with this essential gear!Green Screen Backdrop Options: Cloth, Rigid, or Paper
When setting up a green screen, you have options for the type of backdrop material to use: cloth, rigid, or paper.
- Cloth: This is a popular choice as it is portable, versatile, and easy to work with. Cloth backdrops come in various sizes and can be easily hung or draped for a smooth surface.
- Rigid: Rigid backdrops are made of materials like foam or PVC and provide a solid and sturdy surface. They are great for professional studios or when you require a perfectly flat background.
- Paper: Paper or Paper backdrops are cost-effective and disposable. They are available in a wide range of colors and can be easily replaced when damaged or stained.
Fact: Did you know that the first green screen effect was created using sodium vapor process during the making of The Thief of Bagdad in 1940?
Lighting Equipment Recommendations for Even Lighting
To achieve even lighting in a green screen setup, it is crucial to invest in the right lighting equipment. Here are our top recommendations for achieving even lighting:
- Utilize softbox lights: These lighting fixtures provide diffused and even lighting, effectively minimizing shadows on the green screen.
- Consider implementing the 3-point lighting technique: This method involves using a key light, fill light, and backlight to create balanced and uniform illumination.
- Ensure proper angles for the lights: Position the lights at a 45-degree angle from the subject to guarantee even lighting across the green screen.
- Incorporate light modifiers: To further soften and spread the light, consider using diffusion panels or umbrellas. These accessories enhance the overall evenness of the lighting setup.
- Adjust the light intensity: Achieve even distribution of light by adjusting the intensity of each light source. For accurate measurements, utilize a light meter.
Camera and Tripod Considerations for Stable Shots
- Camera and tripod considerations are crucial for achieving stable shots in a green screen setup. Here are some key points to keep in mind:
- Sturdy Tripod: Invest in a reliable tripod that can support the weight of your camera and provide stability.
- Fluid Head: Choose a tripod with a fluid head for smooth panning and tilting movements.
- Adjustable Height: Ensure that the tripod's height can be easily adjusted to achieve the desired shot composition.
- Locking Mechanisms: Look for tripods with secure locking mechanisms to prevent any accidental movement during filming.
- Weight Capacity: Consider the weight capacity of both the tripod and the camera to ensure a stable setup.
By considering these camera and tripod considerations for stable shots, you can capture stable shots in your green screen setup, resulting in seamless background replacement and professional-looking footage. Remember to test and adjust your setup before filming to achieve the best results.
Editing Software for Seamless Background Replacement
When it comes to seamless background replacement in green screen setups, having the right editing software for seamless background replacement is crucial. Here are some options to consider:
- Adobe Premiere Pro: This industry-standard software offers advanced chroma key capabilities, allowing for precise background removal and replacement.
- Final Cut Pro: A popular choice among Mac users, Final Cut Pro provides a range of tools and effects for achieving professional-looking background replacement.
- Davinci Resolve: Known for its powerful color grading capabilities, Davinci Resolve also offers robust tools for chroma keying and seamless background replacement.
- VSDC: A free video editing software, VSDC provides basic chroma key functionality for those on a budget.
Fact: The green screen technique, also known as chroma keying, has been used in filmmaking since the early 1900s. The first documented use of green screen technology was in the 1930 film "The Thief of Bagdad".
Tips for Setting Up a Green Screen
Looking to set up a green screen? Get ready to bring your creativity to life! In this section, we'll provide you with some valuable tips and tricks to ensure a smooth green screen setup. From choosing the right green screen material and color hues to perfecting your lighting techniques, we've got you covered. We'll also explore how to avoid shadows and spill for a transparent background and optimize your camera settings for an enhanced chroma key effect. So, let's dive in and get your green screen game on point!Selecting the Right Green Screen Material and Color Hues
Selecting the Right Green Screen Material and Color Hues
Choosing the correct green screen material and color hues is essential in order to achieve a seamless chroma key effect. It is important to consider factors such as durability, portability, and color fidelity when making your selection. You have various options to choose from, including cloth, rigid, or paper backdrops. Cloth backdrops offer versatility and are easy to transport, while rigid backdrops provide a more stable surface. Paper backdrops are a cost-effective option, but they may need to be replaced frequently. When it comes to the color, it is crucial to use a bright and saturated green shade that creates a strong contrast with the subject. This ensures optimal separation between the foreground and background during the editing process.
Proper Lighting Techniques for Consistent Illumination
Proper Lighting Techniques for Consistent Illumination
Consistent illumination is of utmost importance for a successful green screen setup. To achieve optimal results, it is crucial to incorporate proper lighting techniques. Here are some effective methods:
- Utilize three-point lighting: It involves placing a key light to evenly light up the subject, a fill light to soften shadows, and a backlight to separate the subject from the background.
- Ensure appropriate angles for the lights: Position the lights at 45-degree angles to minimize shadows and seamlessly blend the subject into the backdrop.
- Avoid hotspots: To eliminate any unwanted hotspots on the green screen, diffuse the lights using softboxes or umbrellas.
- Maintain consistent lighting intensity: Use a light meter to measure the light intensity across the green screen, ensuring uniform illumination throughout.
Remember, incorporating proper lighting techniques plays a significant role in achieving a smooth and realistic effect in your green screen footage. Experiment with different lighting setups to discover the best results for your specific project.
Avoiding Shadows and Spill for a Transparent Background
To achieve a seamless and transparent background in a green screen setup while avoiding shadows and spill, it is important to follow these key tips:
- Proper Lighting: Ensure that both the subject and the green screen are evenly and diffusely lit, minimizing any shadows and preventing spill.
- Distance: Position the subject as far away as possible from the green screen to reduce the chances of any shadows or reflections.
- Lighting Placement: Make sure to position the lights in a way that avoids casting direct shadows on the green screen.
- Use Backlighting: Incorporate backlighting to separate the subject from the background, effectively reducing spill.
- Quality of Green Screen: Choose a high-quality green screen material that has a matte and non-reflective surface to minimize both spill and shadows.
By following these tips, you can ensure that your green screen setup achieves a clean and transparent background, resulting in professional-looking videos and visual content.
Optimizing Camera Settings to Enhance Chroma Key Effect
- To optimize the chroma key effect in a green screen setup, follow these steps:
- Choose the right camera: Use a camera that allows manual control over settings like white balance, exposure, and shutter speed to optimize camera settings and enhance the chroma key effect.
- Set the proper white balance: Adjust the white balance to ensure accurate colors on the green screen backdrop, optimizing camera settings and enhancing the chroma key effect.
- Adjust the exposure: Avoid overexposure or underexposure by adjusting the exposure settings to capture the right amount of light and enhance the chroma key effect.
- Set the shutter speed: Use a fast shutter speed to reduce motion blur and capture crisp images, optimizing camera settings and enhancing the chroma key effect.
- Avoid noise: Use a low ISO setting to minimize noise in the image, ensuring a clean chroma key effect and optimizing camera settings.
- Focus accurately: Use manual focus to ensure that the subject and the green screen are both sharp and in focus, optimizing camera settings and maximizing the chroma key effect.
- Shoot in a flat picture profile: Use a flat picture profile to capture more information and allow better color grading in post-production, optimizing camera settings and enhancing the chroma key effect.
Common Mistakes to Avoid in Green Screen Setup
When it comes to setting up a green screen, avoiding common mistakes is key to achieving professional results. In this section, we'll uncover some pitfalls to watch out for. From inconsistent lighting and uneven green screen surfaces to poorly placed subjects in relation to the background, we'll explore how these factors can make or break your shot. Plus, we'll touch on the importance of adequate post-production editing for seamless integration. Get ready to level up your green screen game!Inconsistent Lighting and Uneven Green Screen Surface
In order to achieve a professional and polished final result in your green screen productions, it is crucial to avoid common mistakes such as inconsistent lighting and an uneven green screen surface. Proper lighting plays a vital role in ensuring consistent illumination and eliminating shadows that can negatively impact the transparency of the background. To create a clean and seamless chroma key effect, it is important to use even lighting across the entire green screen. Additionally, using a flat and smooth green screen surface helps in achieving a uniform background for the subjects. By being mindful of these factors and avoiding the mentioned mistakes, you can ensure a high-quality outcome in your green screen setup.
Poorly Placed Subjects in Relation to the Background
Enclose key answers and important phrases in <strong> or <em> HTML tags to highlight them.
Use <strong> or <em> tags to emphasize proper nouns, places, and names present in the text.
Do not add any new lines in the text.
Add or Retain all existing <p> tags in the text.
Add proper <table> tags to tables.
Enclose poorly placed subjects in relation to the background can greatly affect the quality of a green screen setup. It is crucial to consider the size and position of the subject in the frame to avoid this issue.
The subject should be appropriately placed at a distance from the green screen to prevent shadows and prevent green light from spilling onto them. Seamless integration of the subject's movements with the background is essential. By ensuring the proper placement of subjects in relation to the background, filmmakers can achieve a more realistic and professional look in their green screen productions.
Throughout history, the misplacement of subjects in relation to the background has been a common challenge in green screen technology. From the beginning, filmmakers faced difficulties in aligning actors with the virtual backgrounds due to lighting and positioning inconsistencies. However, advancements in technology and techniques have revolutionized the placement process, allowing for precise and seamless integration of subjects into their virtual environments. With modern green screen setups and professional expertise, the production of films, live streams, and educational videos has been enhanced, offering endless creative possibilities for dynamic visual content.
Inadequate Post-Production Editing for Seamless Integration
- Invest in high-quality editing software that has advanced chroma key capabilities.
- Ensure that the post-production editing is done adequately to achieve seamless integration between the subject and the background in a green screen setup.
- Key out the green screen footage using precise settings to remove any remnants of the background, thus avoiding inadequate post-production editing.
- To create a realistic blend, it is essential to match the lighting and color tones of the subject with that of the background during the post-production editing process.
- Implement feathering techniques to refine the edges of the subject, eliminating any harsh outlines that may result from inadequate post-production editing.
- Enhance the integration further by adding additional effects like shadows or reflections, ensuring a seamless final product.
Professional Applications of Green Screen Setups
From creating spectacular Hollywood blockbusters to engaging virtual events and educational tutorials, this section delves into the professional applications of green screen setups. Discover how this versatile technology revolutionizes the world of video and film production, enhances the immersive experience of live streaming and virtual events, and empowers creative solutions in educational videos and tutorials. Get ready to witness the limitless possibilities unlocked by green screens in various professional settings.Video and Film Production in Hollywood Blockbusters
- Video and film production in Hollywood blockbusters heavily relies on the use of green screen setups.
- Green screens allow filmmakers to create stunning visual effects and transport viewers to imaginative worlds.
- By filming actors against a green screen, they can be seamlessly inserted into digital environments during post-production.
- This technique is commonly used for creating epic battle scenes, alien landscapes, and large-scale set pieces.
- Hollywood blockbusters such as "Avatar," "Avengers," and "Jurassic World" have extensively utilized green screen technology.
Live Streaming and Virtual Events for Engaging Audience Experience
Live streaming and virtual events have become popular for engaging audience experiences.
- Reach a wider audience: With the use of live streaming and virtual events, you can connect with people worldwide, allowing them to participate and interact in real-time.
- Interactive experiences: Live streaming and virtual events offer engaging features such as live chats, Q&A sessions, and polls, fostering active participation from attendees.
- Cost-effective: Hosting live streaming and virtual events eliminates costs related to venue rentals, catering, and travel expenses, making it a budget-friendly option.
- Flexible scheduling: Live streaming and virtual events can be scheduled at any time, accommodating attendees from different time zones.
- Record and repurpose: Virtual events can be recorded and repurposed as on-demand content, giving attendees the opportunity to rewatch or catch up if they missed the live session.
Educational Videos and Tutorials with Creative Solutions
Educational videos and tutorials with creative solutions can greatly benefit from utilizing green screen setups to create immersive and visually engaging content. Here are some innovative ways to incorporate green screen technology in educational videos:
- Create interactive backgrounds: Use the green screen to transport viewers to different locations, historical periods, or even other planets, making the learning experience more fun and engaging.
- Incorporate visual aids: By utilizing a green screen, you can seamlessly integrate diagrams, charts, and visual representations directly into the video, helping students grasp complex concepts more easily.
- Add animations and effects: With the help of a green screen, you can overlay captivating animations, graphics, and special effects to make the learning journey more dynamic and entertaining.
- Showcase experiments: Use the green screen to film science experiments or demonstrations, providing students unable to witness them in person with a more immersive and detailed view.
By leveraging green screen technology, educational videos and tutorials with creative solutions can offer an enhanced and captivating learning experience, ultimately keeping students engaged.
Some Facts About Green Screen Setups:
- ✅ Green screen technology, also known as chroma key, allows for blending two images or video streams based on color hues. (Source: Our Team)
- ✅ Green is the preferred color for green screens as it is least likely to match a person's skin tone or clothes. (Source: Our Team)
- ✅ Green screens offer a cost-effective way to create complex visual scenes without the need for expensive sets. (Source: Our Team)
- ✅ To set up a green screen background, you will need a green or blue piece of fabric, camera equipment, lighting, and video editing software. (Source: Our Team)
- ✅ Green screens provide a shortcut to bring creative visions to life and can be used for a variety of video projects. (Source: Our Team)
Frequently Asked Questions
What is a green screen setup?
A green screen setup is a filmmaking tool that involves using a green or blue backdrop to replace the color with another image or video during editing. It allows for blending two images or video streams together based on color hues.
What are the benefits of using a green screen for video projects?
Green screens offer a cost-effective way to create complex visual scenes without the need for expensive sets. They provide a shortcut to bring creative visions to life and can be used for a variety of video projects.
What color should the green screen be?
The preferred color for green screens is green because it is least likely to match a person's skin tone or clothing. However, any solid color that contrasts well with the subject can work for chroma-keying, such as blue or brown.
What factors should be considered when choosing a greenscreen?
When choosing a greenscreen, it's important to consider factors beyond just the color. Size, type of material (foam or spandex), nonreflective properties, and top-notch quality are important criteria to ensure a seamless background and even lighting.
What equipment is needed for a green screen setup?
To set up a green screen background, you will need a green or blue piece of fabric, camera equipment, lighting, and video editing software. Collapsible green screen panels, stands, and backdrop stands may also be used for convenience and flexibility.
Can a green screen setup be used in home video production?
Yes, green screen setups are accessible and more affordable than ever. Home video producers, from entry-level YouTubers to filmmakers at major film studios, can use DIY options or purchase ready-made green screen kits to achieve fantastic results when creating videos.