Create Stunning DIY Photo Booth Backgrounds for Memorable Events
.jpg)
Creating a DIY photo booth background can add a personalized touch to any event or celebration. Whether it's a birthday party, wedding, or casual gathering, DIY photo booth backgrounds offer a range of benefits. Here are some reasons why using DIY photo booth backgrounds is a great idea:
1. Personalization: DIY backgrounds allow you to tailor the design and style to match the theme or personality of the event. You can choose colors, patterns, and textures that reflect the occasion and create a unique backdrop.
2. Cost-Effectiveness: DIY photo booth backgrounds are often more budget-friendly compared to renting or purchasing pre-made backgrounds. Using materials and items you already have or can easily source reduces costs without compromising on creativity.
3. Creativity and Originality: DIY backgrounds provide an opportunity to unleash your creativity. You can experiment with various materials, textures, and props to create a backdrop that is original and stands out from the rest.
Choosing the right materials for your DIY photo booth background is crucial.
Some popular options include:
- Fabric Backgrounds: Fabric offers versatility in terms of color, texture, and patterns. It can be draped, pleated, or hung to create a soft and elegant backdrop.
- Paper and Cardboard Backgrounds: These materials are affordable and easy to work with. They can be painted, decorated, or used as a canvas for various creative designs.
- Natural and Organic Backgrounds: Incorporating elements like flowers, leaves, branches, or even natural landscapes can bring a refreshing and enchanting touch to the photo booth.
- Theme-based Backgrounds: Aligning the backdrop with the event's theme adds cohesiveness and immerses guests in the overall ambiance. Consider using props, prints, or symbols that represent the theme.
To get started, here are some DIY photo booth background ideas:
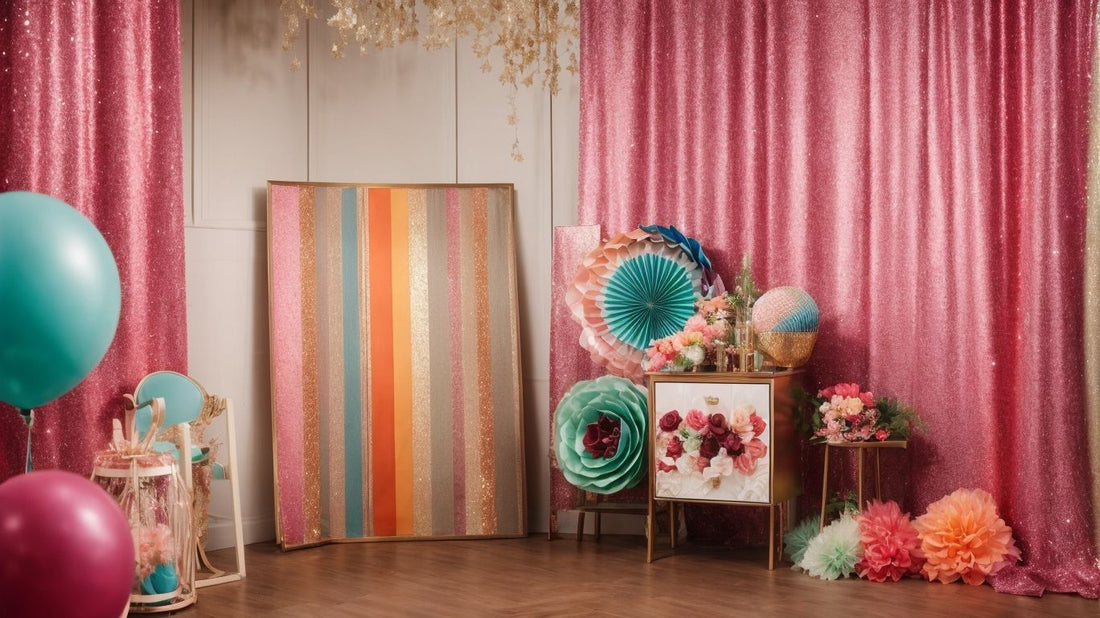
1. Glitter and Sequin Background: Add glamour and sparkle using sequin or glitter-covered backgrounds for a festive touch.
2. Floral and Greenery Background: Create a lush and vibrant setting by using fresh or artificial flowers, foliage, and greenery.
3. Chalkboard Background: Paint a chalkboard surface for guests to leave messages or draw their own designs as part of the photo booth experience.
4. Balloon Wall Background: Create a colorful backdrop using an arrangement of balloons in various sizes, colors, and patterns.
5. Bokeh Lights Background: Hang fairy lights or string lights to create a dreamy and bokeh effect in the background.
Creating DIY photo booth backgrounds involves some simple steps:
- Planning and Designing: Determine the size, style, and theme of your background. Sketch or visualize the desired look before moving forward.
- Gathering the Materials: Collect the necessary materials such as fabric, paper, props, and any additional decorative items needed for the design.
- Assembling the Background: Construct the backdrop by attaching the materials to a sturdy surface or frame. Secure them firmly to ensure they stay in place during the event.
- Adding Props and Accessories: Consider incorporating props like hats, signs, or masks that guests can use while posing for photos. These extras enhance the overall photo booth experience.
Remember these tips and tricks to make the most of your DIY photo booth background:
- Lighting Placement: Ensure that the photo booth area has adequate lighting to capture clear and well-lit photos. Experiment with different lighting angles and intensity to achieve the desired effect.
- Testing and Adjusting: Before the event, test the photo booth background to ensure it functions properly and meets your expectations. Make any necessary adjustments to improve the setup.
- Transportation and Setup: If planning to use the DIY background at multiple events, consider its portability and ease of setup. Opt for lightweight materials and a design that can be assembled and disassembled easily.
With these ideas, steps, and tips in mind, you can create a customized and captivating DIY photo booth background that adds a touch of creativity and fun to your next event.
Key takeaways:
- Personalization: DIY photo booth backgrounds allow for personalized themes and designs, adding a unique touch to any event.
- Cost-Effectiveness: Making your own photo booth backgrounds can be more budget-friendly compared to renting or purchasing pre-made options.
- Creativity and Originality: Creating DIY backgrounds provides an opportunity to unleash your creativity and showcase your original ideas, making your photos stand out.
Why Use DIY Photo Booth Backgrounds?
Looking to step up your photo booth game? Discover why DIY photo booth backgrounds are all the rage! From personalization to cost-effectiveness, and creativity to originality, this section highlights the various reasons why using DIY photo booth backgrounds is a must. Say goodbye to generic and hello to uniquely captivating photo experiences. Let's dive in and explore how these backgrounds can elevate your photography game in a snap!Personalization
When it comes to DIY photo booth backgrounds, personalization is the key to making your event truly unique. Here are some ways you can personalize your photo booth background:
-
Customized Backdrops: Design a backdrop with your own colors, patterns, or logos to match the theme of your event.
-
Photo Collage Backdrops: Create a backdrop using photos of the guests or memorable moments from the event.
-
Handmade Props: Make props that reflect the interests and personalities of your guests.
-
Interactive Elements: Add interactive features like chalkboard backgrounds for guests to write messages or themed backgrounds that allow guests to pose in different scenarios.
By incorporating personalization into your DIY photo booth background, you can create a memorable experience for your guests and make your event truly special.
Cost-Effectiveness
Using DIY photo booth backgrounds is a highly cost-effective option for creating personalized and unique photo experiences. There are several reasons why they are considered cost-effective:
-
Purchasing expensive pre-made backgrounds is not required, saving you money.
-
Materials for DIY backgrounds can be easily sourced and are often budget-friendly, allowing you to stay within your budget.
-
You can repurpose items you already have, avoiding the need for new purchases and further reducing costs.
-
DIY backgrounds provide room for creativity and customization without breaking the bank.
-
Creating your own backgrounds enables you to have complete control over the quality and durability of the materials used, ensuring long-term cost-effectiveness.
Creativity and Originality
Creativity and originality are crucial elements to consider when designing DIY photo booth backgrounds. These aspects allow you to infuse a personal touch into your event and ensure that your photos stand out. Here are some inspiration ideas to fuel your creativity:
- 1. Geometric Patterns: Unleash your creativity by using paper or cardboard to craft distinctive geometric patterns that will elevate the visual appeal of your photos.
- 2. Vintage Wallpaper: Find vintage wallpaper or fabric adorned with playful and unique patterns to fashion a background that embodies a retro theme.
- 3. Nature-inspired Elements: Incorporate natural elements such as flowers, leaves, or branches to infuse a sense of freshness and beauty into your photo booth.
- 4. Themed Props: Immerse your photo booth in the theme of your event, such as creating a beach backdrop adorned with shells and sand for a tropical party.
- 5. Handmade Decorations: Utilize your artistic skills to craft handmade decorations like paper flowers, garlands, or banners. These personalized touches will add a distinctive and individualized flair to your photo booth.
Let your imagination run wild and have fun experimenting with various materials and ideas to craft DIY photo booth backgrounds that are truly one-of-a-kind!
Choosing the Right Materials for DIY Photo Booth Backgrounds
When it comes to creating the perfect DIY photo booth background, the choice of materials is key. From fabric backgrounds to paper and cardboard options, natural and organic vibes to theme-based designs, this section will guide you through all the possibilities. Get ready to discover the endless creative potential and find the ideal backdrop for capturing those memorable moments in style. Let's dive into the world of photo booth backgrounds and unleash your imagination!Fabric Backgrounds
Fabric backgrounds are a popular choice for DIY photo booths due to their versatility and aesthetic appeal. They offer a wide range of options for customization and can easily transform the look and feel of your photo booth. Here are some key advantages of using fabric backgrounds:
- Diversity: Fabric backgrounds come in various colors, patterns, and textures, allowing you to match them with any theme or event.
- Easy installation: Fabric can be easily draped or hung to create a seamless backdrop for your photo booth.
- Lightweight and portable: Fabric backgrounds are lightweight and can be easily transported and set up anywhere.
- Wrinkle-free options: Look for wrinkle-resistant fabrics to ensure a smooth and professional look for your photos.
- Cost-effective: Fabric backgrounds are often more affordable than other materials and can be reused for multiple events.
Pro-tip: Consider using different fabrics to create layers and depth in your photo booth background, adding visual interest and dimension to your photos.
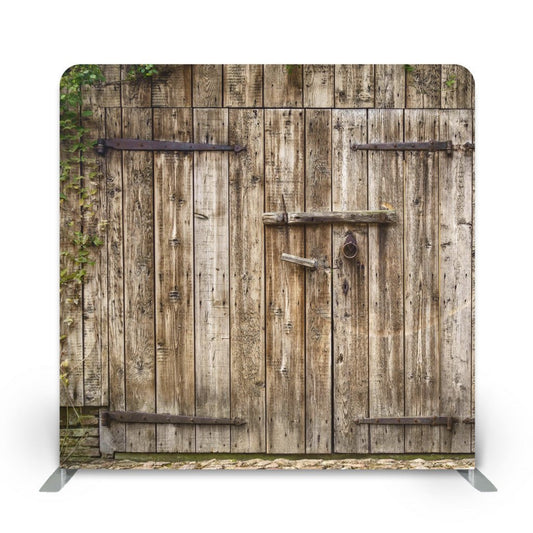
Paper and Cardboard Backgrounds
When it comes to DIY photo booth backgrounds, paper and cardboard are popular options due to their versatility, accessibility, and cost-effectiveness. You can create unique and eye-catching backgrounds using these materials. Here are some ideas for paper and cardboard backgrounds:
- Cardstock cutouts: Create fun shapes or patterns using different colors of cardstock and arrange them on a backdrop.
- Polka dot backdrop: Use adhesive dots or stencils to create a pattern of polka dots on a large sheet of paper or cardboard.
- Texture play: Crumple or fold paper to add texture to the paper and cardboard backgrounds. You can also use corrugated cardboard for a visually interesting effect.
- Paper garlands: Cut strips of paper in various colors and lengths, then string them together to create a festive paper and cardboard background.
- Geometric shapes: Cut out different geometric shapes from colored paper or cardboard and arrange them in a pattern on the paper and cardboard background.
True story: I once attended a wedding that had a DIY photo booth with a paper and cardboard background. The couple had spent hours cutting out paper hearts of various sizes and colors and then pasting them onto a large sheet of cardboard. The result was a stunning and vibrant paper and cardboard background that added a touch of playfulness to the event. Guests couldn't resist taking fun and memorable photos against this creative paper and cardboard background.
Natural and Organic Backgrounds
Natural and organic backgrounds are a sought-after option for DIY photo booths because of their rustic and earthy aesthetic. They offer a rejuvenating and eco-friendly backdrop for unforgettable pictures. These backgrounds can be crafted using various materials like reclaimed wood, branches, leaves, flowers, or even fabrics made from natural fibers such as cotton or linen. By embracing natural and organic elements, you can infuse the photos with authenticity and warmth, making them truly remarkable. Incorporating these elements into your DIY photo booth allows you to create a distinctive and delightful setting that showcases your admiration for nature and sustainability.
In the realm of photography, the utilization of natural and organic backgrounds has gained traction in recent years, owing to the growing consciousness about environmental conservation. Both photographers and individuals have begun integrating nature-inspired elements into their photo booths to foster sustainability and generate visually appealing and memorable experiences.
Theme-based Backgrounds
- Theme-based backgrounds are a fantastic way to enhance your DIY photo booth with a fun and personalized touch. If you're looking for inspiration, here are some theme ideas to get you started:
- If you're going for a beach theme, consider using a vibrant tropical backdrop adorned with colorful beach props like sunglasses and inflatable toys.
- For a vintage vibe, create a backdrop using old film posters or retro wallpaper. Add vintage props such as old cameras and vinyl records to complete the look.
- To bring the glitz and glam of Hollywood to your photo booth, set up a red carpet backdrop and don't forget to include props like movie clapperboards and Oscar statues.
- If you want to transport your guests to a world of fantasy, incorporate a mystical forest or castle backdrop. Enhance the theme with props like wands, crowns, and magical creatures.
- For sports enthusiasts, opt for a sports-themed background featuring sports-related images or team logos. Provide props such as jerseys and sports equipment to make the experience even more fun.
Remember to choose a theme that aligns with the occasion and reflects your personal style. Get creative and experiment with different theme-based backgrounds to make your photo booth truly unforgettable.
DIY Photo Booth Background Ideas
Looking to jazz up your DIY photo booth backgrounds? Look no further! In this section, we'll explore a variety of creative ideas that will take your photo booth game to the next level. From glamorous glitter and sequin backgrounds to beautiful floral and greenery setups, we've got you covered. If you're going for a more rustic vibe, why not try a chalkboard background? Feeling whimsical? A balloon wall background might be just what you need. And for a touch of enchantment, consider the magical bokeh lights background. Let your imagination run wild with these amazing DIY photo booth background ideas! Reference Data: DIY photo booth backgrounds
Glitter and Sequin Background
Creating a glitter and sequin background can add sparkle and glamour to your DIY photo booth event. Here are some ideas for incorporating glitter and sequins into your photo booth backdrop:
- Choose the right materials: Use a large piece of fabric or a backdrop stand as the base. Apply adhesive to the fabric and sprinkle glitter or attach sequin fabric to create a shimmering effect.
- Mix and match colors: Experiment with different color combinations to match your event theme or create a striking contrast.
- Add texture: Combine different sizes of sequins or use glitter in various shapes, such as stars or hearts, to add depth and visual interest.
- Accessorize with props: Complement the glitter and sequin backdrop with props like oversized sunglasses or feather boas for an extra touch of glam.
- Ensure proper lighting: Use spotlights or fairy lights to enhance the sparkle of the glitter and sequins, creating a magical ambiance in your photos.
Floral and Greenery Background
A popular choice for DIY photo booths is a background featuring a floral and greenery theme. This natural and refreshing design adds a touch of elegance and enhances the overall aesthetic of your photos. To create this captivating backdrop, gather either fresh or artificial flowers, as well as greenery such as ferns or eucalyptus. Securely attach these elements to a sturdy backdrop, arranging them in an artistic manner. Once complete, place the finished floral and greenery background behind the photo booth area to serve as a beautiful setting for your pictures. For an added tip, mist the flowers with water periodically throughout the event to help them last longer.
Chalkboard Background
A background made to resemble a chalkboard is a popular choice for DIY photo booths due to its versatility and nostalgic charm. It serves as a blank canvas where guests can write messages, draw pictures, or create custom designs. By using either chalkboard vinyl or paint, you can easily create this versatile backdrop. It is especially well-suited for a variety of events, such as weddings, birthdays, or parties with a fun and interactive atmosphere. You can personalize it further by using different colored chalks or chalk markers. Just make sure to regularly erase and refresh the background to ensure that guests always have enough space to showcase their creativity. So, go ahead and get inspired as you have fun designing unique chalkboard backgrounds for your next photo booth event.
Balloon Wall Background
A balloon wall background can add a fun and vibrant touch to a DIY photo booth setup. Creating a balloon wall is simple and cost-effective, requiring just a few materials. Here is a breakdown of the steps involved in creating a balloon wall background:
- Choose your colors: Select a color scheme that matches the theme or occasion.
- Gather your balloons: Inflate a variety of balloons in different sizes to create visual interest.
- Prepare your backdrop: Use a sturdy base such as a foamboard or a wooden frame to attach your balloons to the balloon wall background.
- Attach the balloons: Secure the balloons to the backdrop using glue dots or double-sided tape. Arrange them in an overlapping pattern to create a full and textured look.
- Add finishing touches: To make your balloon wall background even more eye-catching, consider adding other decorations such as streamers, banners, or fairy lights.
Remember to test the setup before the event to ensure everything is secure and visually appealing. Have fun and get creative with your balloon wall background for a memorable photo booth experience.
Bokeh Lights Background
To create a stunning Bokeh Lights Background for your DIY photo booth, follow these steps:
- Prepare the materials: Gather string lights, preferably with small LED bulbs, and a solid-colored backdrop, such as dark blue or black.
- Hang the backdrop: Use a sturdy rod or tape to secure the backdrop to the wall. Ensure it is taut and wrinkle-free.
- String the lights: Start from one side of the backdrop and weave the Bokeh Lights Background back and forth, creating a zigzag pattern. Make sure the lights are evenly spaced.
- Secure the lights: Use small hooks or clear tape to hold the Bokeh Lights Background in place. Avoid causing any damage to the lights or backdrop.
- Test the lighting: Turn on the lights and check for any dark spots or uneven distribution. Adjust the positioning or add more lights if needed.
- Add finishing touches: Decorate the surrounding area with props or additional lighting to enhance the overall ambiance.
With a Bokeh Lights Background, you'll create a magical and enchanting atmosphere for your photo booth, capturing beautiful and mesmerizing moments.
How to Create DIY Photo Booth Backgrounds
Looking to add some personal flair to your next event? Learn how to create your very own DIY photo booth backgrounds. From planning and designing to gathering materials and adding props, we'll guide you through each step of the process. Get ready to capture picture-perfect memories with backgrounds that are as unique as you are. Let's dive in and discover the secrets to creating a photo booth experience that will leave your guests impressed and Instagram-ready!Step 1: Planning and Designing
- Consider the theme: Think about the occasion and the atmosphere you want to create.
- Research and gather inspiration: Look for ideas online or in magazines to spark your creativity.
- Determine the size and dimensions: Measure the space available for your photo booth and decide on the appropriate size for your background.
- Select the materials: Choose the materials that fit your theme and budget, such as fabric, paper, or props.
- Create a design sketch: Draw out your design idea to visualize how it will look in the photo booth.
- Plan the layout: Decide where the background will be placed in relation to the camera and other props.
- Consider lighting: Think about how the lighting will affect the background and make adjustments if needed.
To illustrate the importance of Step 1: Planning and Designing, I recall a true story. A couple wanted a beach-themed wedding photo booth. They meticulously planned and designed a background using blue fabric, seashells, and a handmade wooden sign. The background turned out beautifully and added a special touch to their wedding memories.
Step 2: Gathering the Materials
Gathering the materials is a crucial step in creating a DIY photo booth background. Here is a step-by-step guide:
- Depending on your design, gather materials like fabric, paper, cardboard, natural elements, or themed decorations.
- Measure and Cut: Measure the dimensions needed for your background and cut the materials accordingly.
- Prepare Attachments: If necessary, prepare any attachments like hooks, clips, or adhesive strips.
- Assemble: Start assembling the background by attaching the materials together as planned.
- Add Finishing Touches: Enhance the background by adding props, accessories, or additional decorations.
Step 3: Assembling the Background
To assemble a DIY photo booth background, follow these steps:
- Prepare the materials needed, such as the backdrop, adhesive, and props.
- Set up a clean and spacious area to work on.
- Step 3: Assembling the Background - Start by attaching the backdrop to a sturdy frame or wall using adhesive or clips.
- Smooth out any wrinkles or creases on the backdrop for a polished look.
- Add any additional elements, such as banners, signs, or decorations, to enhance the background.
- Ensure that the background is securely fastened and stable to avoid any accidents during use.
- Test the background by taking a few trial photos to make any necessary adjustments.
- Once everything is in place, your DIY photo booth background is ready for use!
I remember assembling a DIY photo booth background for my sister's wedding. We spent hours carefully choosing the materials, arranging the decorations, and ensuring everything was perfectly aligned. It was a labor of love, but seeing the joy on everyone's faces as they posed in front of our creation made it all worthwhile. The background added a personal touch to the wedding memories and created a fun and interactive experience for all the guests. It was definitely a highlight of the wedding day!
Step 4: Adding Props and Accessories
Adding props and accessories is a crucial step in creating a DIY photo booth background. This step allows you to enhance the theme or atmosphere of your photo booth and make it more interactive and enjoyable for your guests. Here are some steps to follow when adding props and accessories:
- Choose props that align with the theme of your photo booth. For example, if you have a vintage theme, consider using props like vintage hats, scarves, and old cameras.
- Organize the props in an appealing and accessible manner. Display them on a table or place them in baskets or boxes for easy access.
- Encourage guests to use the props by placing signs or instructions to inspire creativity and engagement.
- Step 4: Consider adding accessories like masks, wigs, or sunglasses to add a fun and playful element to the photos.
- Regularly check and replenish the props and accessories throughout the event to ensure there are enough options for all guests.
Remember, the key is to provide a diverse selection of props that will encourage guests to have fun and be creative. So, let your imagination flow and have fun with the process of choosing and adding props and accessories to your DIY photo booth background.
Tips and Tricks for DIY Photo Booth Backgrounds
With these tips and tricks for DIY photo booth backgrounds, you'll be able to create the perfect setting for capturing fantastic pictures. From mastering the art of lighting placement to perfecting the process of testing and adjusting, we'll cover it all. Plus, we'll provide advice on transportation and setup, ensuring that your photo booth is easy to transport and simple to assemble. Get ready to impress your guests with stunning backdrops and memorable photo moments!Lighting Placement
Proper lighting placement plays a crucial role in creating the perfect atmosphere in your DIY photo booth. To ensure optimal lighting for your background, follow these essential tips:
- Positioning: Place your lights at a 45-degree angle from the subject to avoid harsh shadows.
- Multiple light sources: Incorporate multiple lights to achieve even lighting and eliminate unwanted shadows.
- Distance: Experiment with the distance between your lights and the background to achieve the desired effect.
- Light modifiers: Utilize diffusers or softboxes to soften the light and create a more flattering appearance.
- Color temperature: Ensure to match the color temperature of your lights to the ambient lighting for a cohesive look.
Testing and Adjusting
- Incorporate keywords naturally: Testing and Adjusting are crucial for a successful DIY photo booth experience. It is important to test and adjust your background to achieve the desired results.
- Follow these steps for the best results:
- Test Lighting: Experiment with different light sources to find the perfect balance for your background.
- Adjust Distance: Fine-tune the placement of the background to avoid shadows or reflections.
- Tweak Props: Make necessary adjustments to props and accessories to enhance the overall look.
- Test Camera Settings: Play around with camera settings like exposure and white balance to achieve optimal results.
- Evaluate Feedback: Get feedback from participants to identify any improvements that can be made.
- Remember, Testing and Adjusting are ongoing processes. Continuous evaluation and improvement will help you create the best DIY photo booth experience for your guests.
Frequently Asked Questions
1. Can you provide some unique DIY photo booth backdrop ideas?
Yes, there are numerous unique photo booth backdrop ideas you can try. Some popular ones include using crepe paper streamers, tissue paper backdrops, metallic fringe backdrops, and colorful crepe paper trails backdrops. You can find a comprehensive list of 56+ DIY photo booth backdrop ideas on Pinterest and an additional 180+ ideas in the provided link.
2. What are some tips for building a sturdy photo booth backdrop?
When building a photo booth backdrop, it's important to consider its size, transportation, and sturdiness. Here are some tips: - Make the backdrop at least 8x8 feet to accommodate large groups. - Ensure it can be easily assembled, transported, and broken down. - Use a sturdy stand that can support the weight of the backdrop. - Consider the time it will take to create and be realistic about your capabilities. - Place the backdrop in front of a wall that can be accessed from both sides, focusing on the top and sides as the middle is often covered by people.
3. What materials should be used for a photo booth backdrop?
The material used for a photo booth backdrop should have a matte or uncoated finish to avoid glare from the flash. It is important to choose a backdrop material that is not too transparent. Textured materials can be used, but make sure to fill in any gaps to prevent empty spaces when the light hits the backdrop. Additionally, repurposing items from the ceremony altar, such as wreaths or chuppahs, can work well in front of a clean backdrop.
4. How should a photo booth backdrop be placed?
When placing a photo booth backdrop, it is recommended to keep it indoors or under shelter to protect it from rain and wind. Avoid placing it near bright windows or lights to prevent unwanted glare. Also, consider the possibility of people stepping back into the backdrop, so having some give at the bottom can be helpful. Keep the photo booth in the shade if possible. Pay attention to the top and sides of the backdrop, as the middle is often covered by people.
5. Can you recommend methods of attachment for a photo booth backdrop?
Attaching a photo booth backdrop can be done using various methods. Some options include using a backdrop stand, attaching it to previously existing walls, or exploring the venue for interesting walls that could be used. Depending on the backdrop material, you may need different methods of attachment. For example, for balloon installations, companies like Badass Balloon Co. often recommend using a sturdy stand or broom handle for support and stability.
6. Where can I find step-by-step tutorials or additional backdrop ideas?
For step-by-step tutorials and additional backdrop ideas, you can refer to websites or blogs that specialize in DIY photo booth backdrops. Websites like Lovely Indeed and PhotoG Booth provide detailed tutorials and inspiration. Stylist Desiree Ontiveros and the internet's favorite backdrops, such as Hi Miss Puff, also offer a variety of fresh ideas. Additionally, Pinterest boards dedicated to photo booth backdrops have an extensive collection of unique and creative ideas.