10 Creative DIY Wedding Photo Booth Ideas for Memorable Pictures
.jpg)
Planning a wedding involves making countless decisions, and one of the key elements that can add a touch of charm and entertainment to your special day is a DIY wedding photo booth. Creating a photo booth yourself offers several advantages that make it an appealing choice for couples. Here are a few reasons why you should consider a DIY wedding photo booth:
- Cost-Effective: DIY photo booths are a budget-friendly alternative to renting a professional one. By using your own equipment and materials, you can save a significant amount of money.
- Personalized Touch: A DIY photo booth allows you to incorporate your own personal style and creativity into the setup. You can customize the backdrop, props, and overall theme to match your wedding aesthetic.
- Fun and Interactive Experience: Photo booths are a fantastic way to engage your guests and create enjoyable memories. DIY setups encourage guests to have fun and interact with each other, resulting in candid and spontaneous moments captured on camera.
In order to set up a successful DIY wedding photo booth, there are a few key considerations to keep in mind. You will need to select the ideal location that provides ample space and a suitable backdrop for your desired theme. Lighting and equipment are also crucial factors to ensure high-quality photographs.
To enhance the photo booth experience, DIY props play a significant role. These can include signs, chalkboards, and themed props that reflect your wedding theme and personalities. selecting the right backdrop is essential. It could range from floral and greenery backdrops for a romantic touch to vintage and rustic backdrops for a more nostalgic feel.
When it comes to the setup, you can choose between an open-air booth, an enclosed booth, or even an interactive booth that includes fun elements like boomerangs or GIFs.
In this article, we will discuss various DIY wedding photo booth ideas, provide tips on incorporating props and poses, and share some helpful tricks to ensure everything runs smoothly on your big day. By following these suggestions, you can create a unique and memorable photo booth experience that will delight both you and your guests.
Why Choose a DIY Wedding Photo Booth?
Looking to add some pizzazz to your wedding celebration? Let's dive into why you should consider a DIY wedding photo booth! From being cost-effective to adding a personalized touch, and creating a fun and interactive experience, we'll explore the enticing reasons behind choosing this charming addition. So, get ready to capture those candid moments, save some bucks, and create memories that will last a lifetime!1. Cost-Effective
Creating a cost-effective DIY wedding photo booth is a great choice for couples who want to save money on their special day. Here are some affordable ideas to consider:
- Instead of using expensive backdrops, opt for plywood boards or chalkboard cutouts.
- Transform an inexpensive photo booth or a small adjoining room into your photo booth area.
- Save on costs by using disposable cameras or a twin pack of film instead of hiring a manned photo booth.
- Encourage guests to use their own smartphones and selfie sticks to capture photos.
- Add a personal touch by creating DIY props and decorations using materials like cardboard, craft paper, and fabric scraps.
By incorporating these cost-effective ideas, you can create a fun and memorable DIY wedding photo booth experience without breaking the bank.
2. Personalized Touch
A DIY wedding photo booth is a fabulous way to incorporate a personalized touch into your special day. Here are some unique ideas to make it truly one-of-a-kind:
1.Utilize chalkboard paint on a plywood board to craft a custom backdrop that allows guests to express themselves through messages or illustrations.
2.Infuse props that reflect your interests and personalities, such as themed props, frames, and accessories. This will add a personal touch and make the photo booth experience even more enjoyable.
3.Consider incorporating digital backdrops or photo booth apps to provide a variety of backgrounds and effects for your pictures. This will elevate the overall experience and allow for even more creative possibilities.
4.Create a guest book idea that incorporates photo strips or instant pictures. This way, your guests can write little notes or messages alongside their fun and memorable photos.
5.Utilize decorative props and accessories to enhance the overall aesthetic of your DIY photo booth. This will ensure that the booth complements the rest of your wedding decor and creates a visually appealing setting.
By implementing these personalized touches, your wedding photo booth will undoubtedly create everlasting memories for both you and your guests to cherish.
3. Fun and Interactive Experience
- A DIY wedding photo booth can provide a fun and interactive experience for your guests. Here are some steps to create a memorable photo booth:
- Choose an open or enclosed photo booth setup based on your preferences.
- Create a themed backdrop using materials like floral and greenery, vintage and rustic, or glitter and sequins.
- Set up proper lighting and equipment to capture high-quality photos.
- Prepare a variety of props for guests to use, such as signs, chalkboards, and frames.
- Encourage guests to strike different poses and get creative with their photos.
- Consider adding interactive elements like a guest book station or DIY selfie stations.
- Ensure there is easy access to disposable cameras or selfie sticks for additional photo options.
- Provide instructions on how to access digital copies or prints of the photos.
- Make sure the photo booth area is well-organized and easily accessible to guests throughout the event.
Setting Up a DIY Wedding Photo Booth
Planning a memorable wedding? Look no further than setting up your own DIY wedding photo booth! In this section, we'll show you how to create the perfect backdrop, select a location that will dazzle your guests, and ensure your photos are beautifully lit with the right equipment. Get ready to capture those priceless moments and create a photo booth experience that will leave your loved ones in awe. Let your creativity shine as we dive into the exciting world of DIY wedding photo booths!1. Selecting the Perfect Location
Incorporating these considerations will assist you in selecting a perfect location for your DIY wedding photo booth, creating lasting memories for you and your guests. When choosing the ideal spot for your DIY wedding photo booth, take into account the following factors:
| 1. Accessibility: | When selecting a perfect location, opt for one that is easily accessible to your guests, ideally near the reception area or dance floor. |
|---|---|
| 2. Lighting: | Find a spot with an abundance of lighting to ensure high-quality photos. Avoid areas with harsh shadows or dim lighting that could affect the photo's quality. |
| 3. Background: | Look for a backdrop that complements the theme and style of your wedding. Consider incorporating natural elements such as greenery or floral arrangements to create a picturesque setting. |
| 4. Space: | Make sure that the location provides enough room for the photo booth setup, props, and a comfortable area for guests to pose and gather. |
| 5. Privacy: | Choose a location that offers some privacy for shy guests or those who prefer a more intimate photo session. |
| 6. Accessibility to Power: | Verify if the location has access to power outlets if you plan to use electronic equipment like cameras or printers. |
By considering these aspects, you will be able to choose a perfect location for your DIY wedding photo booth, ensuring that you and your guests create unforgettable memories.
2. Backdrop and Decorations
Creating a backdrop and decorating your DIY wedding photo booth can add a touch of personalization and enhance the overall experience for your guests.
- Backdrop: Choose a backdrop that reflects the theme and style of your wedding. Options include floral and greenery backdrops, vintage and rustic backdrops, or glitter and sequin backdrops.
- Decorations: Add decorative elements such as fairy lights, bunting, or paper flowers to create a festive atmosphere. Consider incorporating props that match your wedding theme, such as themed props or frames and accessories.
True story: When I set up a DIY wedding photo booth for my sister's wedding, we incorporated stunning backdrops and decorations to create a memorable experience. Using a combination of floral wallpaper and hanging fairy lights, we built an enchanting backdrop that perfectly matched the theme. We also adorned the booth with vintage frames and props, adding a touch of nostalgia. The guests were absolutely thrilled to take photos against our beautifully decorated backdrop, and it generated beautiful memories that we still cherish today.
3. Lighting and Equipment
When setting up a DIY wedding photo booth, proper lighting and equipment are crucial for capturing great pictures. Here are some key considerations:
- Choose the right lighting: Lighting plays a vital role in creating stunning wedding photos. Opt for soft, diffused lighting to avoid harsh shadows and achieve a flattering effect.
- Invest in quality equipment: To ensure high-resolution images with better clarity and detail, it is essential to use a DSLR or mirrorless camera.
- Set up a steady platform: To capture sharp and non-blurry photos, setting up a tripod is essential. It keeps the camera steady throughout the event.
- Enable remote triggers or timers: Guests should have the freedom to take their own photos without needing to press the shutter button manually. Remote triggers or timers can make this possible.
- Enhance lighting with additional sources: For venues with dim lighting, consider incorporating external flash units or LED panels to enhance the overall lighting setup.
Fact: Proper lighting and equipment play a significant role in improving the overall quality of wedding photos. They can transform ordinary pictures into professional and memorable keepsakes.
DIY Wedding Photo Booth Props
Looking to add a touch of fun and creativity to your wedding photos? Look no further than the DIY Wedding Photo Booth Props! In this exciting section, we'll explore three sub-sections bursting with ideas: Signs and Chalkboards, Themed Props, and Frames and Accessories. Get ready to discover unique and innovative ways to jazz up your wedding photo booth, ensuring unforgettable memories for all your guests! So grab that camera and let's dive into the world of DIY wedding photo booth props.1. Signs and Chalkboards
When setting up a DIY wedding photo booth, signs and chalkboards can add a personal and creative touch to the experience.
- Chalkboard signs: Use chalkboard paint to transform a plywood board into a customizable sign where you can write fun messages or directions for your guests.
- Handwritten messages: Write little notes on mini chalkboards and place them around the booth for guests to interact with and add their own messages.
- Chalkboard cutouts: Create unique shapes or frames from chalkboard material for guests to hold or pose with in their photos.
Remember to keep the signs and chalkboards in line with the overall wedding theme and style for a cohesive look.
Other suggestions for the DIY wedding photo booth include incorporating props and backdrops, setting up in a well-lit area, and providing a variety of photo booth accessories for guests to enjoy.
2. Themed Props
| Themed props are a popular addition to DIY wedding photo booths, adding a fun and personalized touch to the experience. Here are some ideas for themed props to include: |
| 1. Signs and Chalkboards |
| 2. Themed Props: Costumes and Accessories |
| 3. Themed Hats and Headpieces |
| 4. Props related to the wedding theme (e.g., beach props for a beach-themed wedding) |
| 5. Speech Bubbles with Funny Messages |
3. Frames and Accessories
When setting up a DIY wedding photo booth, frames and accessories are essential for enhancing the overall experience. Here are some ideas to consider:
- Props: Incorporate frames of various sizes and styles for guests to pose with. This can include polaroid cut-out frames, chalkboard cutouts, or decorative frames.
- Signage: Use signs with fun phrases or instructions for guests to hold up while taking photos.
- Accessories: Provide a range of accessories like hats, glasses, and masks to encourage guests to dress up and unleash their creativity.
- Backdrop enhancements: Utilize frames as a decorative element on the backdrop or attach accessories directly to the frame to achieve a dynamic look.
- Personalization: Add a personal touch to the photo booth by customizing frames with the couple's names, wedding date, or theme.
By incorporating frames and accessories creatively, you can elevate the photo booth experience and create lasting memories for your wedding guests.
DIY Wedding Photo Booth Backdrops
Looking to add a touch of DIY charm to your wedding? Look no further than our section on DIY Wedding Photo Booth Backdrops. Get ready to wow your guests with stunning backdrops that will set the perfect stage for those memorable moments. From enchanting floral and greenery backdrops to vintage and rustic vibes that exude timeless elegance, and even glitter and sequin backdrops that add a touch of sparkle and glam, we've got you covered. Let your creativity soar as we explore these magnificent options!1. Floral and Greenery Backdrops
Adding a touch of elegance and natural beauty to DIY wedding photo booths, floral and greenery backdrops are a wonderful choice. If you're looking for ideas on how to create stunning floral and greenery backdrops, here are a few suggestions:
- One option is to use fresh flowers and greenery to construct a live floral wall, which will bring a vibrant and organic feel to the backdrop.
- For a durable and economical alternative, consider crafting a backdrop using artificial flowers and greenery, ensuring it lasts throughout the entire event.
- To create a romantic and whimsical atmosphere, you can hang garlands of greenery along with fairy lights, adding a soft and enchanting touch to the backdrop.
- Another idea is to arrange potted plants and flowers, resulting in a lush and vibrant backdrop that exudes natural beauty.
Let me share a true story with you: A couple decided to use a floral and greenery backdrop for their DIY wedding photo booth. They collected flowers from their own garden and enlisted the assistance of friends to arrange them on a wooden frame. The result was nothing short of breathtaking, as the backdrop added a fresh and natural touch to their wedding photos.
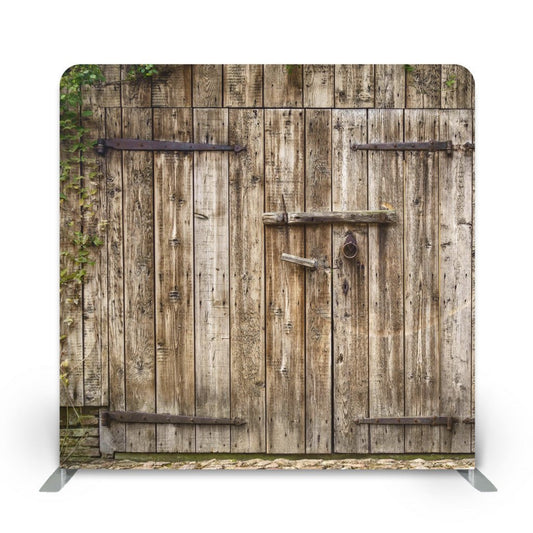
2. Vintage and Rustic Backdrops
Vintage and rustic backdrops have the power to add charm and character to a DIY wedding photo booth. If you're looking to create a nostalgic atmosphere, here are some ideas to consider:
- Embrace the authentic backdrop of barn doors, utilizing their rustic charm.
- Stack wooden crates and embellish them with flowers and greenery for a touch of vintage appeal.
- For a whimsical backdrop, find unique vintage doors and lean them against a wall.
- Consider incorporating vintage furniture pieces like dressers, chairs, or sofas as backdrops to enhance the old-fashioned vibe.
- Hang floral-patterned wallpaper to infuse a vintage-inspired element into the backdrop.
- Elevate the boho vibe by hanging woven tapestries or macrame curtains.
- To add a rustic touch, repurpose old windows as a backdrop and embellish them with flower garlands.
By incorporating these vintage and rustic backdrops, you can transport your guests to a bygone era and create beautiful memories.
3. Glitter and Sequin Backdrops
Glitter and sequin backdrops have become a highly popular choice among individuals looking to create DIY wedding photo booths. These backdrops effortlessly add a touch of glamour and produce a stunning visual setting for capturing memorable moments. If you are considering incorporating glitter and sequin backdrops into your wedding photo booth, here are some helpful suggestions to guide you:
- Select a color scheme that harmonizes with your wedding theme or overall décor for a cohesive look.
- You have the option of utilizing a sequined fabric as the backdrop or selecting a pre-made sequin backdrop.
- To enhance the sparkle effect, consider incorporating fairy lights or string lights into the backdrop.
- Experiment with various lighting techniques to ensure the glitters and sequins truly shine.
- Encourage guests to interact with the backdrop by providing fun props like confetti or sparklers.
- Make certain that the backdrop is spacious enough to accommodate group shots comfortably.
- Regularly inspect and clean the backdrop to keep it looking its best throughout the event.
Incorporating a glitter and sequin backdrop into your DIY wedding photo booth will undoubtedly result in stunning and glamorous photos that you, along with your guests, will cherish for years to come.
DIY Wedding Photo Booth Setup Ideas
Looking to add a touch of fun to your wedding day? Get ready to capture unforgettable moments with these DIY wedding photo booth setup ideas. We'll explore three exciting sub-sections: open-air photo booths, enclosed photo booths, and interactive photo booths. Whether you prefer a trendy and spacious setup, a cozy and intimate atmosphere, or an interactive experience that will keep your guests entertained, we've got you covered. Let's dive into the world of DIY wedding photo booths and make your big day even more memorable!1. Open-Air Photo Booth
An open-air photo booth is a fantastic addition to any wedding celebration, bringing a fun and interactive element. When setting up an open-air photo booth, it is important to consider the following key points:
- Choose the ideal location: Select a spacious area with ample lighting for guests to comfortably take photos.
- Create a backdrop: Enhance the ambiance by using decorative props, floral walls, or DIY chalkboard backdrops.
- Set up lighting and equipment: Ensure the proper lighting is in place and use a tripod or stand to keep the camera steady.
Pro-tip: To make the open-air photo booth experience even more enjoyable, provide a variety of themed props and props for posing. This will create unforgettable memories captured in the open-air photo booth.
2. Enclosed Photo Booth
An enclosed photo booth is an ideal choice for weddings as it provides privacy and creates a more intimate experience for guests. When setting up an enclosed photo booth, there are several key elements to consider:
- Choose the perfect location: It is important to find a spacious area that can easily accommodate the photo booth and is accessible for guests.
- Create an inviting backdrop: Enhance the ambiance and create a distinct background by using decorative props such as flower walls or faux floral walls.
- Set up proper lighting and equipment: Ensure that the booth is well lit and equipped with a reliable camera and printer to produce high-quality photos.
- Incorporate interactive features: Encourage guests to have fun and be creative by offering props like selfie sticks or themed accessories.
- Provide digital options: Allow guests to instantly share their photos on social media or conveniently email them for easy access and sharing.
- Include a guest book station: Arrange a table with props and markers where guests can leave personalized messages alongside their photo strips.
With an enclosed photo booth, your wedding guests will have a memorable and enjoyable experience capturing moments and creating lasting memories.
3. Interactive Photo Booths
- Interactive photo booths are a captivating addition to any wedding celebration. Here are some ideas to craft a captivating and engaging interactive photo booth experience:
- Virtual props: Incorporate digital backdrops and filters that guests can conveniently choose and apply to their photos.
- Social media integration: Allow guests to instantly share their exquisite photos on various social media platforms.
- Animated GIFs: Set up a booth that expertly captures multiple photos in quick succession to produce delightful and entertaining animated GIFs.
- Boomerangs: Create a remarkable looping video effect that infuses dynamic movement into the photos, enhancing their appeal.
- Slow-motion videos: Set up a booth that skillfully captures mesmerizing slow-motion videos, offering distinctive and enjoyable memories for everyone.
- Touchscreen interaction: Install user-friendly touchscreens that enable guests to effortlessly add graphics, captions, or even draw on their photos, adding a personal touch.
- Green screen technology: Utilize a green screen backdrop to imaginatively transport guests to various virtual locations, making their photo experiences even more immersive.
- Augmented reality: Seamlessly incorporate cutting-edge AR elements that can be instantly superimposed onto photos in real-time, adding a innovative and interactive dimension to every shot.
With the inclusion of these interactive photo booths, guests are guaranteed to have an absolute blast, creating extraordinary and indelible memories at your wedding.
Props and Poses for Wedding Photo Booths
When setting up a wedding photo booth, it's important to consider the props and poses that will make the experience fun and memorable for your guests. Here are some ideas to incorporate into your photo booth setup:
- Must-have props: Include classic props like hats, glasses, and mustaches, as well as wedding-themed props such as a veil, bow tie, or bouquet.
- Themed props: Customize your props to match your wedding theme or colors, such as beach-themed props for a destination wedding or rustic props for a barn wedding.
- Sign props: Include signs with fun phrases like "Just Married" or "I Do" for guests to hold up in their photos.
- Interactive props: Add props that can be used for playfulness and interaction, such as a bubble machine or confetti poppers.
- Poses: Provide a backdrop with instructions for different poses, like a kiss on the cheek or a group jump, to encourage creativity in the photos.
DIY Wedding Photo Booth Tips and Tricks
Looking to add a fun and interactive element to your special day? Incorporating DIY wedding photo booth tips and tricks can help you create a memorable experience for you and your guests. Here are some suggestions:
- Backdrop: Choose a backdrop that matches your wedding theme or get creative with a personalized backdrop using props, fabrics, or flowers.
- Props: Enhance the photo booth experience by providing a variety of props like hats, sunglasses, signs, or themed props that reflect your wedding style.
- Lighting: Ensure the photo booth area has proper lighting. You can use natural light or add string lights or spotlights for a flattering effect.
- Camera setup: For capturing the best angles, use a digital camera or smartphone with a tripod for stability and remote shutter control.
- Printing options: Give your guests the option of on-site printing or encourage them to share their photos on social media by creating a unique hashtag.
By incorporating these DIY wedding photo booth tips and tricks, you can create a memorable experience, capturing special moments from your big day.